
A Game Changer
There are times when you encounter a product that changes your assumptions about how things work in this world. They can be simple, like intermittent windshield wipers. I’m old enough to remember the first time I saw them in action. Such a simple solution to something that anyone who drives in the rain has to face.
At the risk of hyperbole, the MindShift rotation180° Panorama is that kind of product. I look at this pack and I remember shooting at Mesquite Dunes in Death Valley and trying to change a lens. You learn quickly the first time you set your pack down on those dunes that the last place you want to open your pack is down low, with all that blowing sand. There’s just no way to keep the sand out of your bag. The only way to keep your gear sand-free is to keep it a few feet off the ground. But the contortions I had to go through in order to change a lens without setting my old bag down looked (and were) ridiculous. I also remember shooting in the surf in Big Sur. You’d best not set that bag down, even if you think it’s far enough back to stay dry because there’s just no telling when a giant wave is going to come crashing onto shore. Or maybe you’re on a steep slope where you risk it all rolling downhill.

This is a bag you never have to set down in order to access your gear. Ever. And yes, the magic of keeping sand out of your pack in Death Valley or keeping it dry and safe in Big Sur is awesome. But the daily use of this pack even in “safe” places to set your pack down is the thing that’s going to change the way you shoot.
The Pack
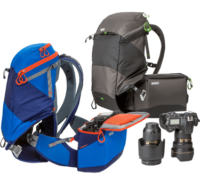
This is the second pack of this basic design from Mindshift. They took a core concept from Think Tank’s rotation pack and rethought and improved the design. Their first bag in this line is the rotation180° Professional. The Pro is the bag that I’ve watched Marc and Andy fall in love with. The thing that kept me from jumping on board was the size. The Pro version will be the perfect size for those with multiple pro-sized bodies and lenses. But I’m not one of those. I tote a D600 with a few lenses. I want a bag that’s just big enough. When MindShift sent us a bag for review, I jumped at the chance to test it out.
As awesome as the design of the rotation180° Professional is, MindShift didn’t just downscale that bag, they again rethought the design, reducing the number of parts, the weight, and the cost. It’s a light and capable bag with a more streamlined look than the Pro version. It’s also really comfortable. Too many camera packs out there turn a blind eye to comfort. They are awkward squares mounted on your back, with the weight too far from your body to stay comfortable for long. This pack is comfortable. The shoulder straps are well padded, with the chest straps to help distribute the weight, and of course, the waist strap on which the design of this pack hinges.
Design
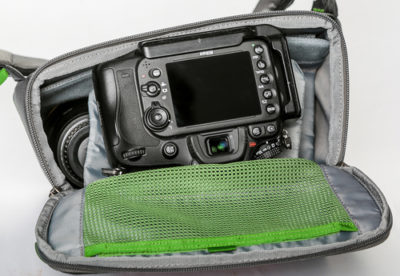
At the core of the design of this bag is the rotating belt pack. Swinging the pack out for use is a snap. Just push down on the magnetic locking mechanism, and the side flap will swing open. There’s a handle to rotate the pack out. It helps to use your other hand to pull on the waist strap. A two-hand twist and you’re all set. The belt pack is right there in front of you, an awesome workspace for swapping out lenses, grabbing a filter, or whatever.
The locking mechanism is insanely easy to use. It won’t pull out (because it locks!) but slides down easy-peasy. When you need to snap it together, the magnets do all the work for you, and it somehow clips together in exactly the way it wouldn’t come apart. It’s ingenious and awesome.
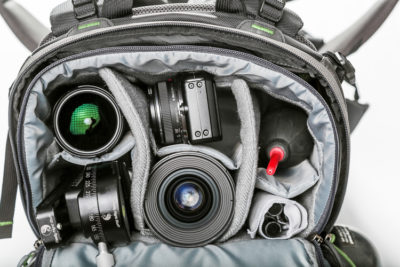
As you can see I can fit my D600 with the 28-300 lens and L-bracket attached. There’s still room for a couple of lenses. In my case I have the Nikkor 24mm1.4, Nikkor 16mm fisheye and Zeiss 18mm. The Canon cameras tend not to be quite as tall, so they fit a bit better than the Nikons, which fit a bit snug. But both fit just fine. Also in the belt pack is a slot for storing some filters or even an iPad or other tablet.
To the left of the pack, there is some webbing on the strap. This is where you could attach some additional storage, like the Lens Switch Case, Filter Hive, or the Peak Design Capture Clip. This is a nice feature, as it can increase the pack’s capacity when you need it.
Or, if you want to downsize, you can use the belt pack all on its own. Maybe you’re heading out to shoot some surf and you only need a few options handy. Just undo the retention clip and the belt pack easily slides out of the pack for stand-alone use.
The way you use the top storage depends on the activity. I’m planning on using this as my main camera bag, so with the optional photo insert ($45), you can add more lenses, flashes, remotes, or whatever you normally carry in your camera pack. Or if you’re skiing, mountain biking, or engaging in any kind of more adventurous outing you can store food and additional clothing in the top, which is nice because it keeps it segregated from your camera gear. This is THE bag for that kind of activity, I think. It’s got a narrow profile, keeps close to the body, and is just very comfortable. And, in a quick and easy motion, your gear is right there for you.
Above the top storage is a smaller pocket for keeping smaller items, your phone, wallet, keys, etc. There’s room on the side for a 3-liter water bladder. While this works just fine, it’s a bit of a pain to get the bladder in (at least with the Camelbak I used), and this is one of my small nits about this bag. But in the end, the pack holds the 3-liter bladder just fine, and frankly, I’m so happy to have this option that the minor inconvenience of getting the bladder in is very much worth it.
There are three methods for attaching your tripod to this pack.
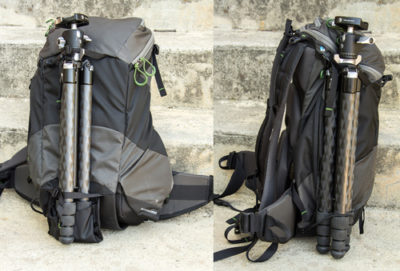
First, there is the standard back of the pack mount. Just pull the straps and cup out of their storage area, and you’re all set. The top strap has a clip to release it and there’s also a lock to ensure your tripod is truly secure.
Second, you can attach the tripod to the side with the elastic and straps as shown here. Not as secure, perhaps, but possibly better for while you’re out in the field; it’d be easier to access and also would put the weight closer to your body, making for a more comfortable hike. The strap-up top doesn’t release, so you have to thread the tripod through it. A release on this strap would have been a nice touch.
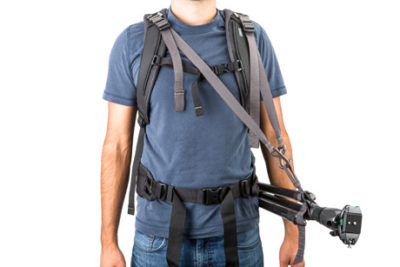
Third, you can use the optional tripod suspension kit along with the same elastic strap you used in the second option. This is a good alternative to putting the tripod over your shoulder as you walk from spot to spot. You can use the tripod with the suspension kit still attached, then just slip the feet in the elastic and move on. Honestly, this option takes a bit of getting used to. I mostly just put the tripod on my shoulder, but there are times when I know I’m pretty sure I’ll be walking a distance without shooting that I’ve been really glad to have the option.
My smaller tripod, the Really Right Stuff TQC-14 looks like it was made for this bag. Larger tripods such as the Really Right Stuff TVC-23 work fine, just don’t use the tripod cup. You can also use the suspension kit (which works just fine with a full-sized tripod).
The Hidden Feature
All the talk about this pack is centered around the rotating belt pack. I haven’t seen anyone yet mention the added bonus this pack has — the top is accessible without setting the pack down, too! This means that you can access EVERYTHING in this pack without once setting it down. Just leave the waist strap on, but slip your arms out of the shoulder straps. Rotate the pack, and dig on in. It’s all there for you, easy as pie.
Pros
Never have to set it down to access your gear
Lightweight
Comfortable
The perfect size (unless it’s not!)
Belt pack on its own is a great option
Small, light and affordable
Cons
Water bladder’s a pain to get in
Side tripod mount could be better designed with a releasable strap
Rain cover not included, available at additional cost
Can’t comfortably hold full-sized tripods (but they work great with the tripod suspension kit)
A bit of a pain to access when it’s not on your back, when it’s on the seat in your car, for instance.
Bottom Line
As you can tell, I love this bag. It’ll be great for anyone using a non-pro camera with a moderate lens lineup. If you don’t fall in that category, then the MindShift rotation180° Pro bag is most likely for you. Either way, you go, the MindShift rotation180° bags will really change the way you shoot, allowing you to focus much more clearly on getting the shot rather than finding a safe spot for your bag.
You can get more info from the MindShift site, here.
Thanks to good friend Nikolai for help with some of the product shots!